How to Set Up Cloud Backup on macOS with KopiaUI
OneDrive · Google Drive · NAS Integration Guide
A step-by-step guide to building a cloud backup on macOS with KopiaUI, using OneDrive, Google Drive, or a NAS as the repository. It covers everything from installing KopiaUI to creating a repository, excluding files, scheduling automatic backups with a snapshot retention policy, and finally running a restore test — giving you a safe macOS backup with point-in-time snapshots, encryption, and deduplication.
The backup you copy to an external drive "every now and then" falls apart the moment you lose a file and find yourself asking, "When did I last copy this?" Accidentally overwritten files, ransomware, and disk failures arrive without warning — and a plain copy or sync only protects the single current state.
Kopia solves this with point-in-time snapshots. You can roll back to an hour ago, yesterday, or any point last week, and because everything is encrypted locally with AES-256-GCM before upload, not even the cloud provider can read it. Thanks to block-level deduplication, backing up every hour barely increases your storage usage. On top of that, it reuses the OneDrive, Google Drive, or NAS you already have as the repository — so there's no extra cost.
This guide walks through how to use KopiaUI as a backup tool on macOS, from connecting OneDrive, Google Drive, or NAS cloud storage to scheduling automatic backups, setting a retention policy, and running a restore test — all configured the way you'd actually run it.
Choosing a backup tool — why KopiaUI? (vs. Kopia CLI & Restic)
Several tools can do the same job.
| Tool | Characteristics |
|---|---|
| Kopia CLI | Same engine as KopiaUI. Great for scripted automation in the terminal. Preferred in server environments. |
| Restic + Rclone | Restic for snapshot backups, Rclone for cloud connectivity. A powerful combination, but the CLI setup is complex. |
| KopiaUI | GUI based. Easy even for non-developers and general users who'd rather avoid the CLI. Open source and free. |
Why use Kopia instead of plain mirroring?
If you just use OneDrive or Google Drive, your files do sync to the cloud — that's true. But there are problems, listed below.
| Issue | Plain mirroring | Kopia backup |
|---|---|---|
| Versioning | Keeps only the current state. Delete a file by mistake and it's gone from the cloud too. | Keeps point-in-time snapshots. Restore to any past point. |
| Special characters in filenames | Names like .hidden, file:name, a/b that OneDrive/Google Drive reject can't sync. |
Stores file contents as encrypted chunks, so there are no filename restrictions. |
| Dotfiles & config files | Hidden files like .env, .ssh, .claude are limited or missed in sync. |
Can back up every file. |
| Symbolic links | Links break or get ignored. | Preserves link metadata (and can follow the target too, as an option). |
| Encryption | The cloud provider can read your content. | Encrypted locally with AES-256-GCM before upload. Even the provider can't read it. |
Install KopiaUI (Homebrew · macOS)
brew install --cask kopiauiIf you don't have Homebrew, install it first from brew.sh. KopiaUI requires macOS 12 (Monterey) or later, and the install package bundles both the kopia CLI binary and the GUI. To download it directly, see the official installation docs.
Launch it from Launchpad or Spotlight (⌘ + Space → KopiaUI).
Once it starts, the Select Storage Type screen appears.

Connect cloud storage — OneDrive · Google Drive · NAS
KopiaUI has no dedicated cloud-integration menu. Instead, you install each cloud service's native macOS app, let it mount as a local folder, and then point KopiaUI to that local path.
The cloud app handles syncing, so Kopia just behaves as if it's writing to a local disk.
2-1. OneDrive (Microsoft 365)
brew install --cask onedriveLaunch the app → sign in with your Microsoft 365 account → after the sync completes, check the mount path:
ls ~/Library/CloudStorage/
# OneDrive-YourCompany

mkdir ~/Library/CloudStorage/OneDrive-YourCompany/KopiaBackup
2-2. Google Drive
brew install --cask google-driveLaunch the app → sign in with your Google account, then set the sync option to "Stream files".

Stream files keeps files in the cloud only and downloads them on access, so it uses almost no local disk space.
When Kopia takes a snapshot it automatically pulls the files it needs, so backup works even without mirroring.
After the sync completes, check the mount path:
ls ~/Library/CloudStorage/
# GoogleDrive-your@gmail.com

mkdir ~/Library/CloudStorage/GoogleDrive-your@gmail.com/My\ Drive/KopiaBackupMy Drive. You can't write directly under GoogleDrive-*/.
2-3. NAS (Synology, etc.)
If you have a personal NAS, you can connect it two ways.
Option A — Network mount (SMB)
Finder → ⌘K → enter smb://nas-ip/share → after mounting, point KopiaUI's Local Directory to /Volumes/ShareName/.
# Verify the mount
ls /Volumes/
# ShareName  ...

mkdir /Volumes/ShareName/KopiaBackup
Option B — SFTP (built into KopiaUI, recommended for Synology)
SFTP mounting on macOS is cumbersome because it needs extra tools (macFUSE, etc.). KopiaUI has a built-in SFTP backend, so it can connect directly without mounting.
On the Select Storage Type screen, choose "SFTP Server", then:
| Field | Example |
|---|---|
| Hostname | 192.168.1.100 or the NAS domain |
| Port | 22 |
| Username | NAS account |
| Path | /volume1/backup/KopiaBackup |
| Key auth | Register an SSH key and no password is needed |
If you already use the Synology Drive app, it mounts at
~/Library/CloudStorage/SynologyDrive-xxx/, so the Local Directory approach works too.
Repository path summary
| Service | Method | Path / setting |
|---|---|---|
| OneDrive | Local Directory | ~/Library/CloudStorage/OneDrive-xxx/KopiaBackup |
| Google Drive | Local Directory | ~/Library/CloudStorage/GoogleDrive-xxx/My Drive/KopiaBackup |
| NAS (SMB) | Local Directory | /Volumes/ShareName/KopiaBackup |
| NAS / Synology | SFTP Server | Hostname + Port 22 + remote path |
Create a KopiaUI repository
3-1. Choose "Local Directory or NAS"
On the Select Storage Type screen, click "Local Directory or NAS".
3-2. Enter the Directory Path
Enter the path of the backup folder you created earlier.
# OneDrive
/Users/your-username/Library/CloudStorage/OneDrive-YourCompany/KopiaBackup

# Google Drive
/Users/your-username/Library/CloudStorage/GoogleDrive-you@gmail.com/My Drive/KopiaBackup
3-3. Set the repository password
Kopia encrypts the repository with AES-256-GCM.
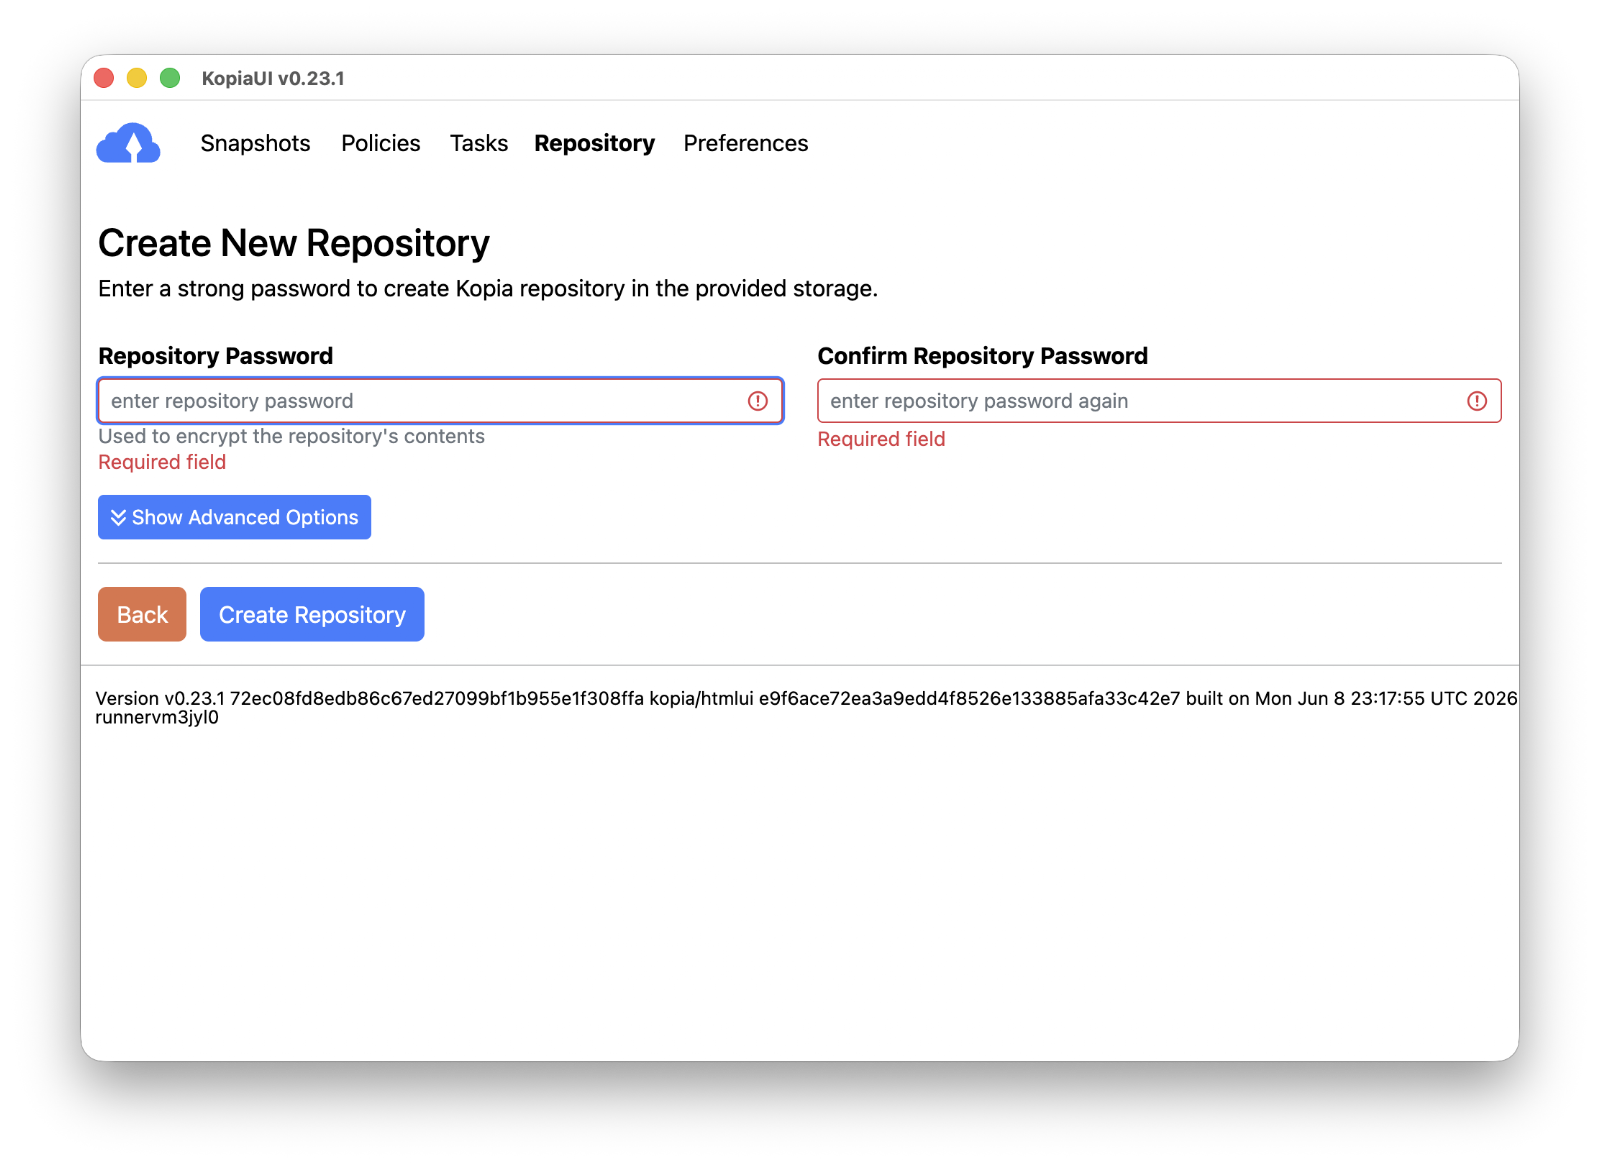
Click "Create Repository" → the repository is created.

Set up file exclusions (Ignore)
Exclude files/directories you don't need to back up, to save time and space.
Method 1: Policy UI (KopiaUI)
Snapshots → select a snapshot → Edit → "Files" tab → enter patterns under Ignore Files.
.DS_Store
.Spotlight-V100
.Trashes
.fseventsd
Library/Caches
Library/CloudStorage~/ tilde doesn't work. Enter paths relative to the backup root.The Effective column shows, in real time, the patterns that will actually apply.
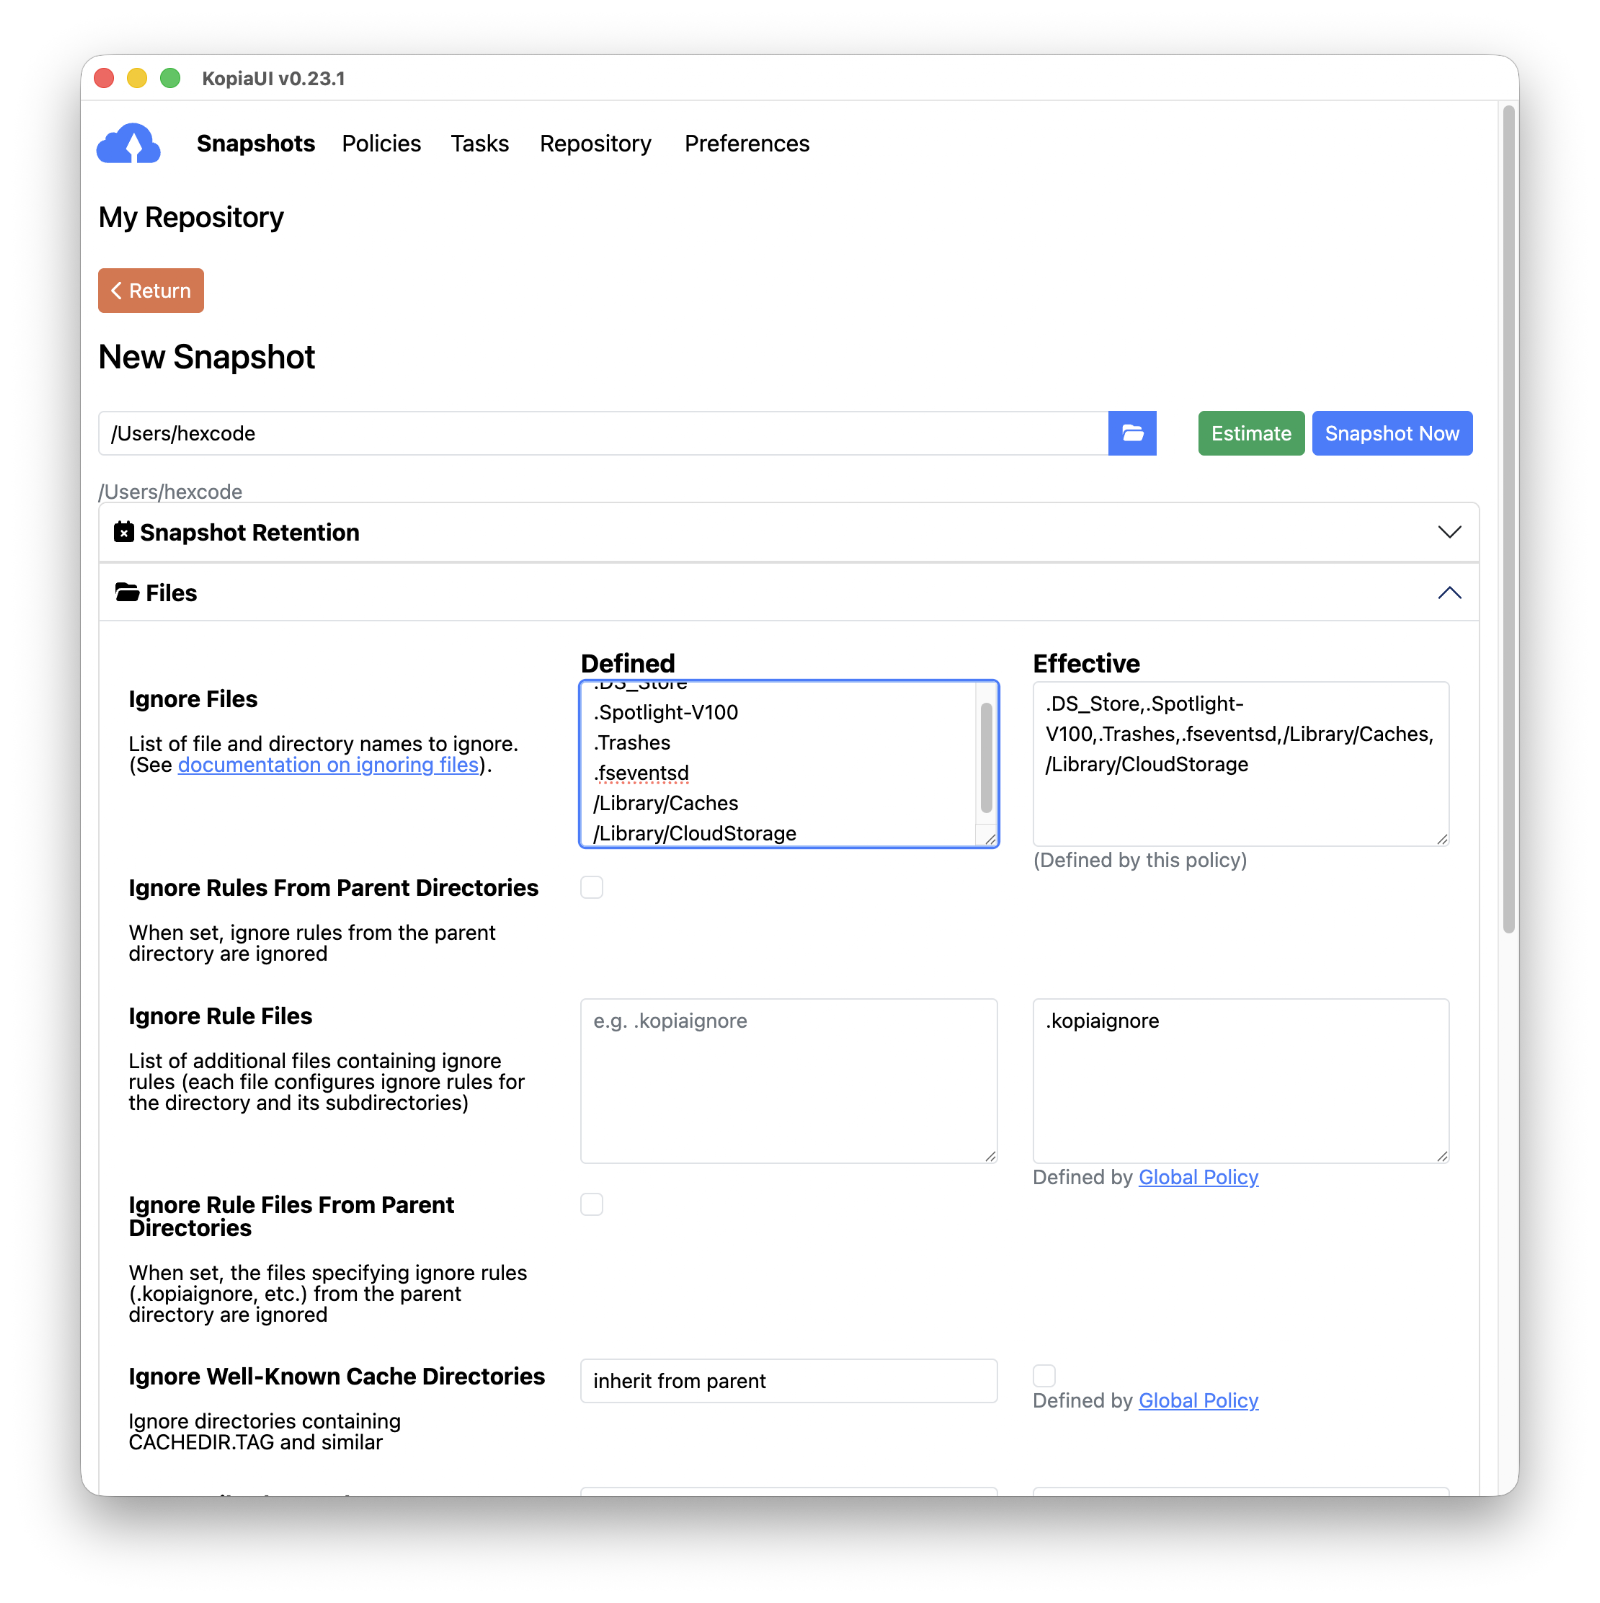
It prevents duplicate backups of data already in the cloud, such as OneDrive or Synology Drive.
Method 2: .kopiaignore file
Create a .kopiaignore file in the directory being backed up and Kopia reads it automatically. It uses the same syntax as gitignore.
cat > ~/.kopiaignore << 'EOF'
.DS_Store
.Spotlight-V100
.Trashes
.fseventsd
Library/Caches/
Library/CloudStorage/
EOF
If you register .kopiaignore under Ignore Rule Files in the Policy UI, the .kopiaignore files in subdirectories are applied automatically too.
Symbolic links
By default Kopia backs up only the symbolic link itself (its metadata) and doesn't follow the target. Turning on the "Follow symlinks" option in the Policy → Files tab follows the target and backs up the actual contents.
~/Desktop or ~/Documents are symlinked into iCloud Drive.
Run your first snapshot (backup)
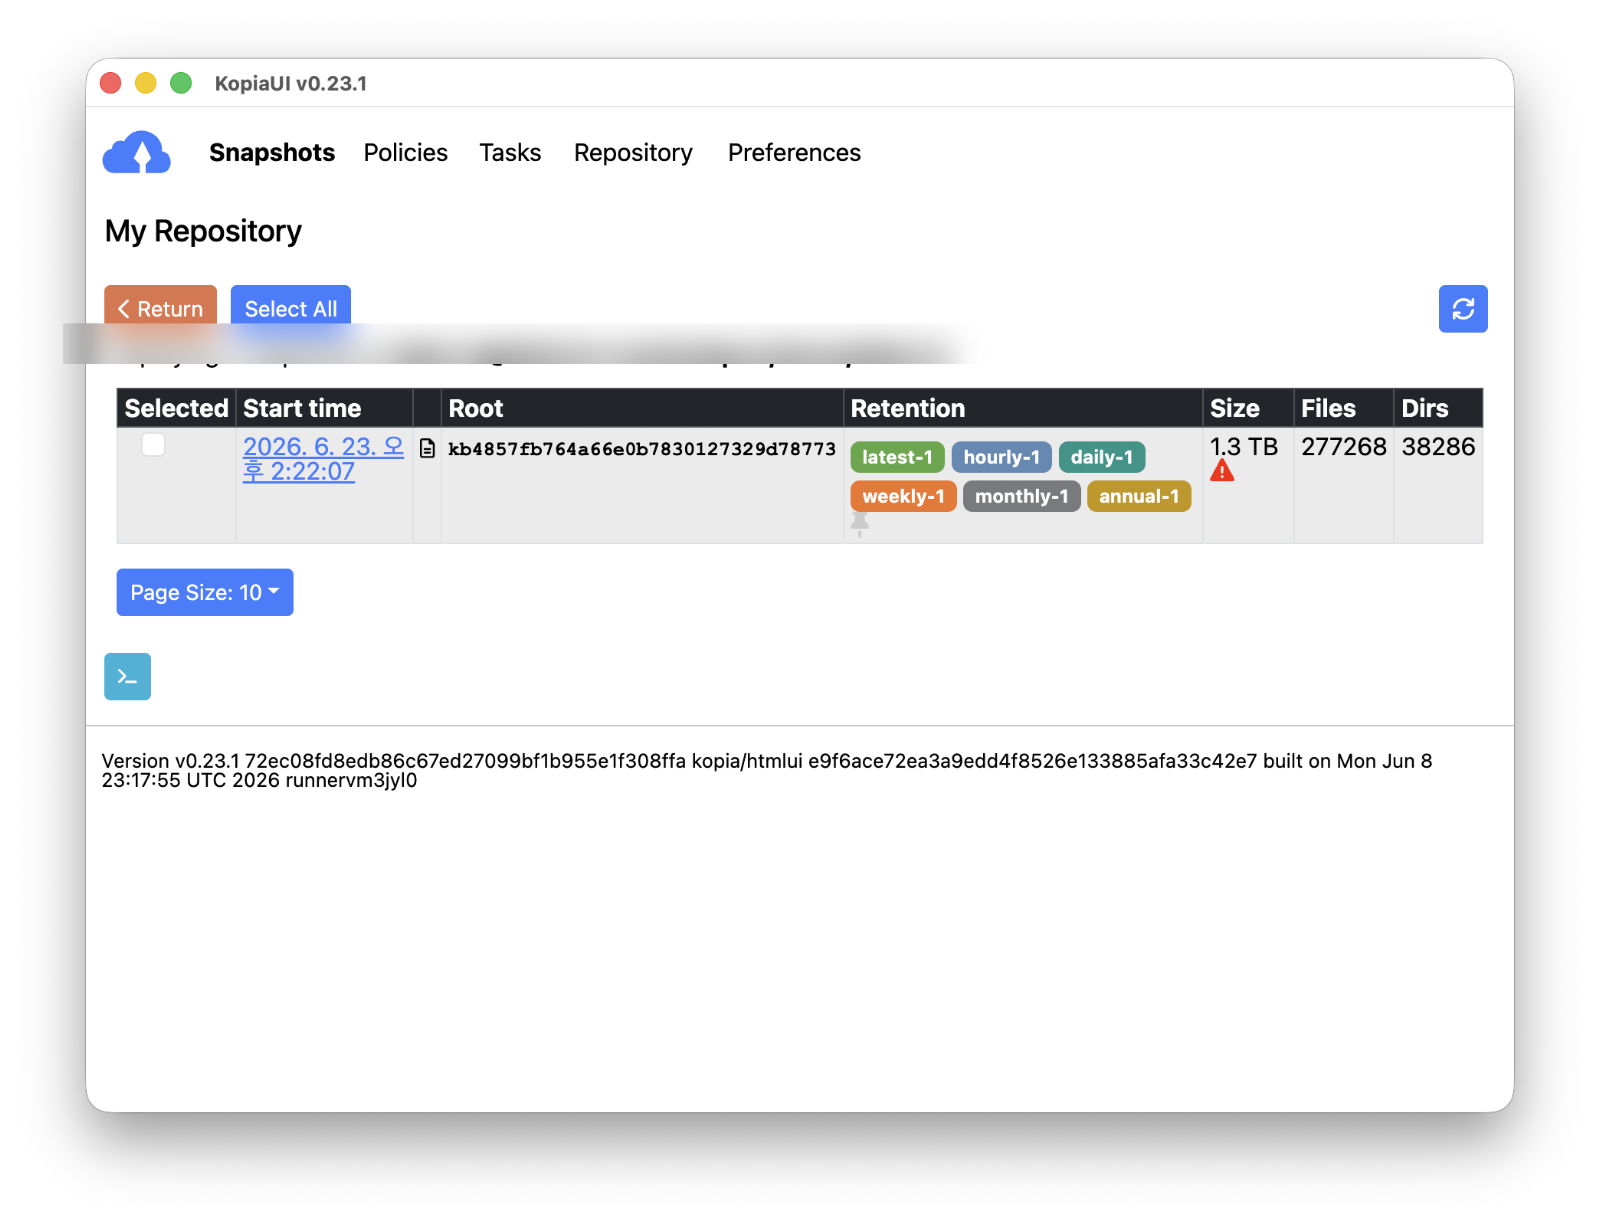
Snapshots tab → "New Snapshot" → enter the local path to back up → click "Snapshot Now".
Once the backup starts, you can watch progress in real time on the Tasks tab.

When it finishes, check the result in the snapshot list.
Set up scheduling & retention policy
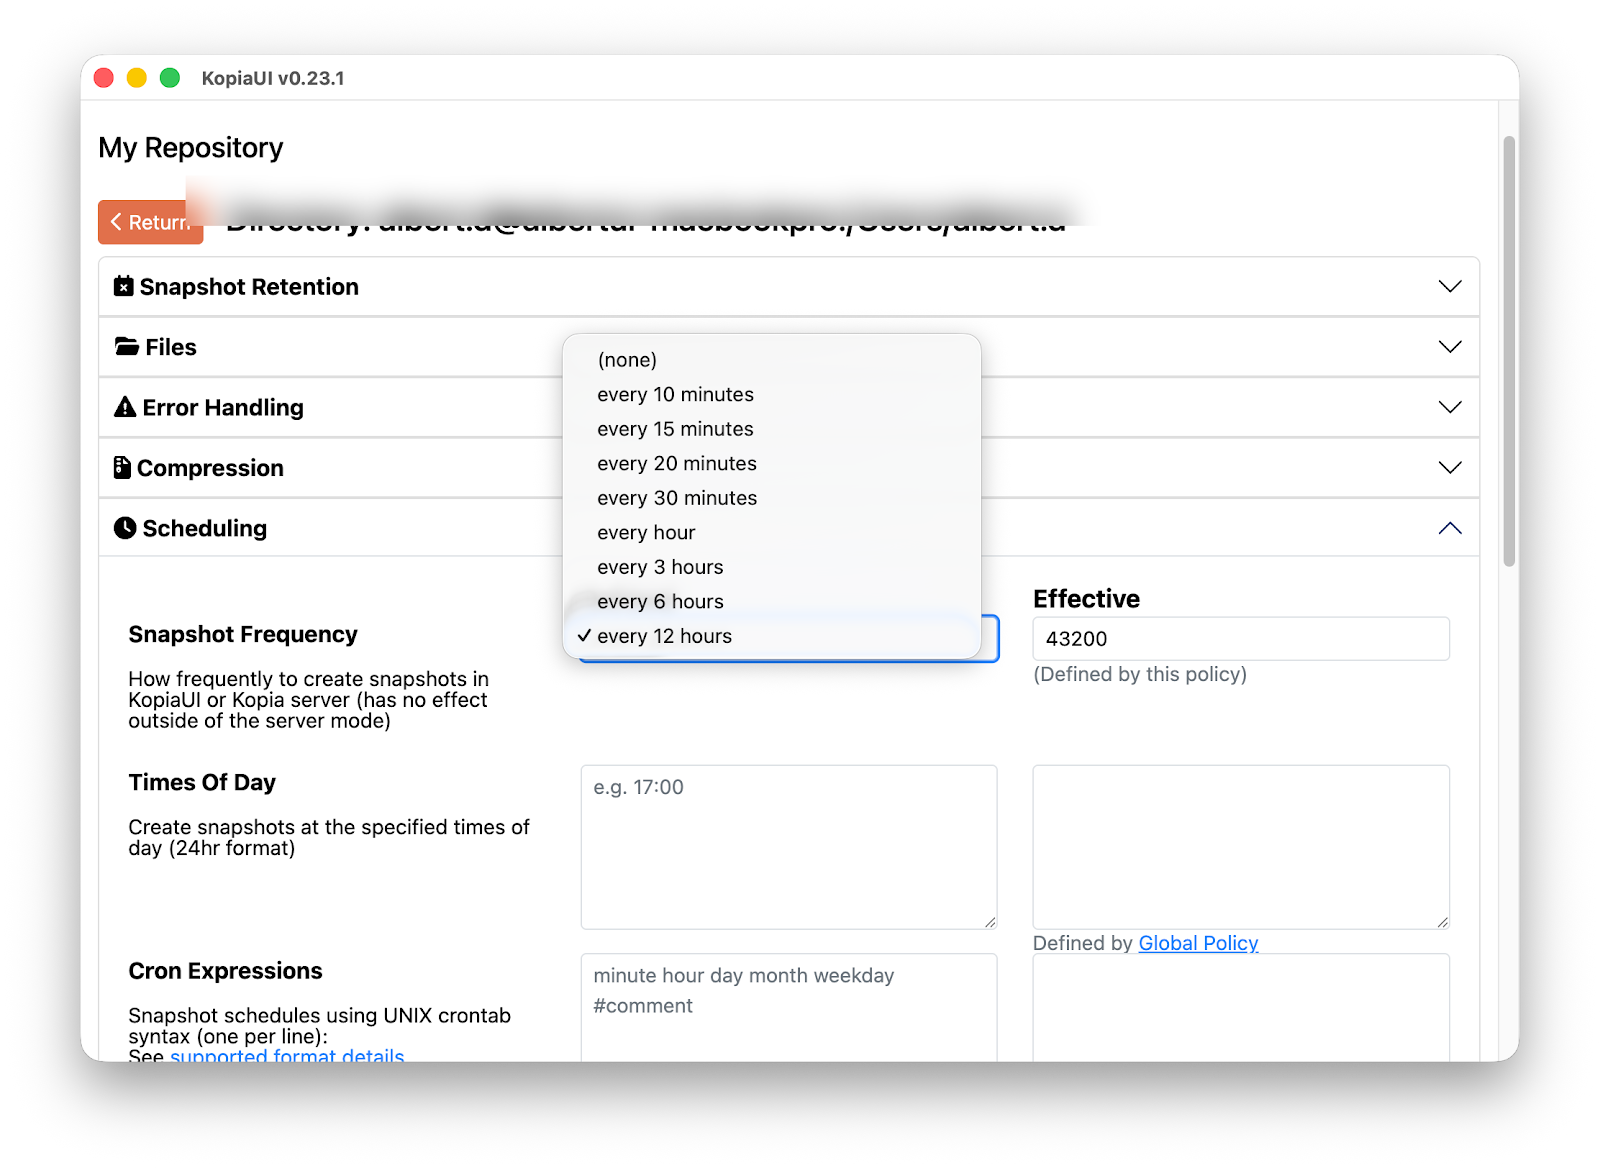
Under Policies → "Edit Policy", configure Scheduling and Retention together.
⏱️ Scheduling — snapshot frequency
Setting the Snapshot Interval to 1 hour or 2 hours is recommended.
Because it's an incremental backup that stores only changed files, running it every hour barely uses any space.
If hourly feels like too much,
4 hours or Daily are good alternatives.
🗄️ Retention — snapshot retention policy
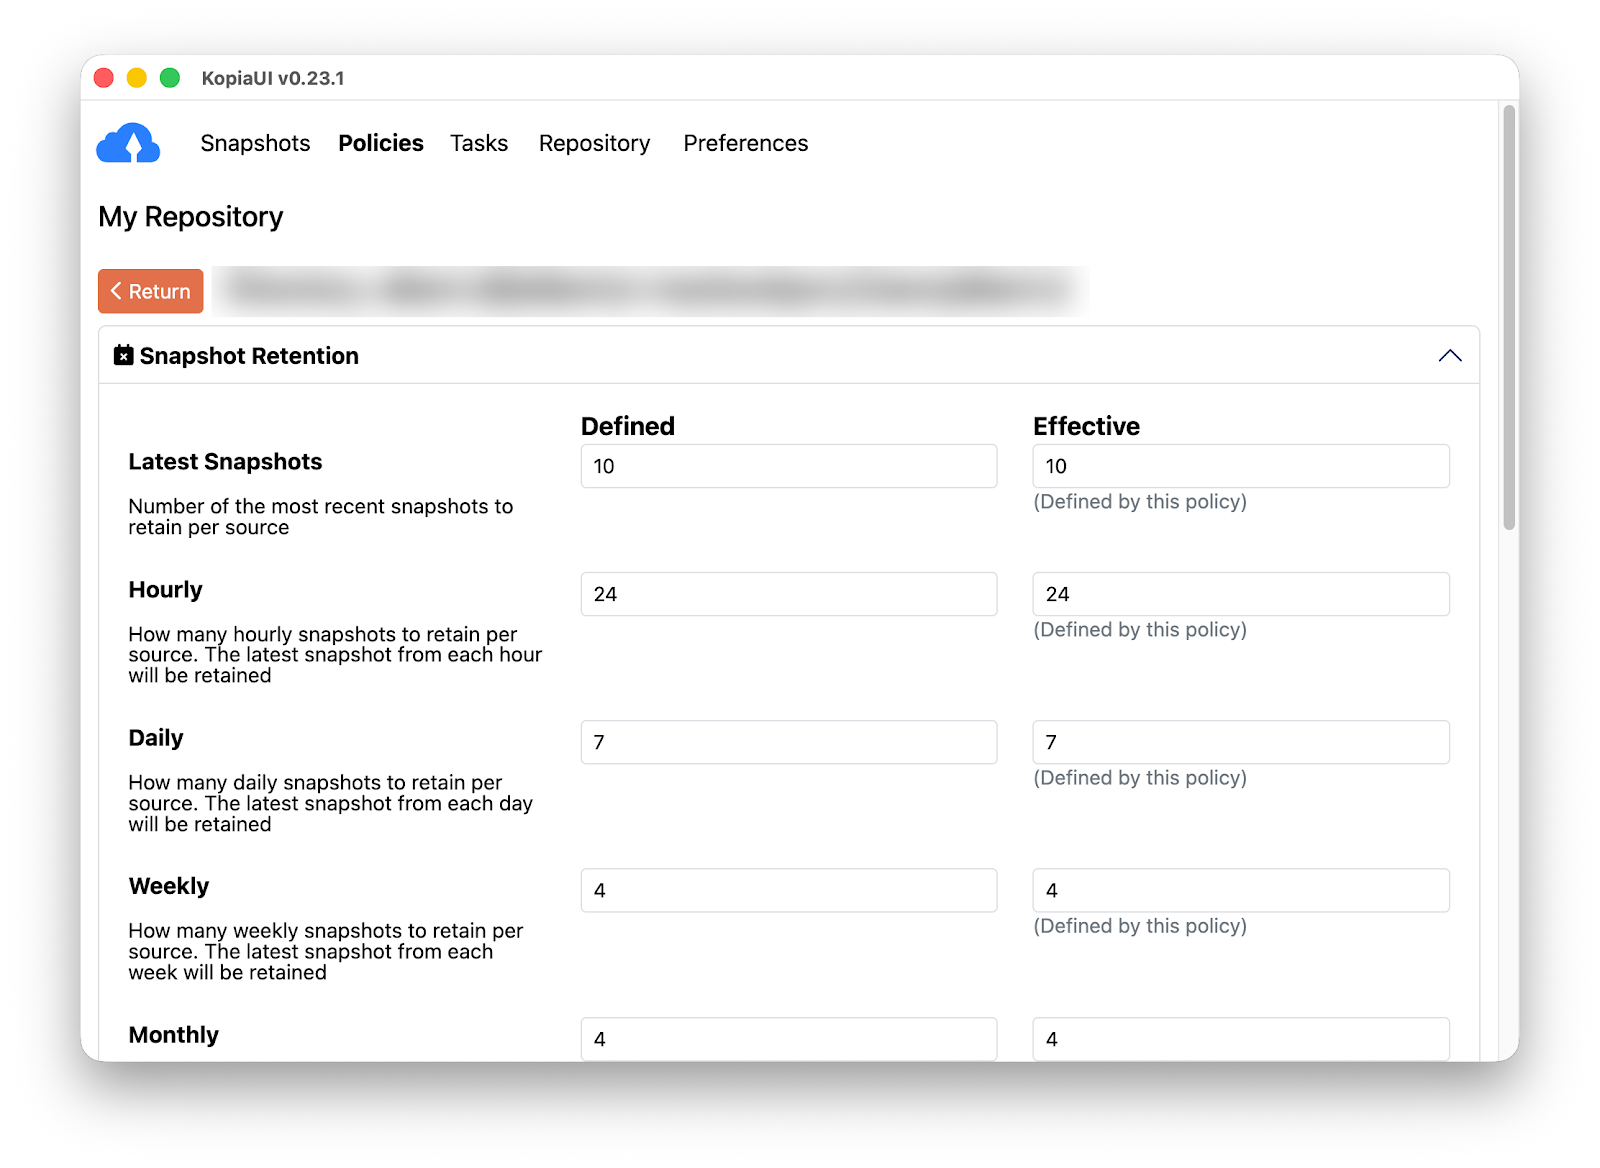
The more often you back up, the more the cleanup rule for old snapshots matters. Configure it in Policies → Edit Policy → Retention.
| Setting | Recommended | Description |
|---|---|---|
| Keep Latest | 10 |
Always keep the 10 most recent snapshots — instantly undo a mistake you just made. |
| Keep Hourly | 24 |
Keep hourly history for the past 24 hours. |
| Keep Daily | 7 |
Keep daily history for the past week. |
| Keep Weekly | 4 |
Keep weekly history up to a month back. |
| Keep Monthly | 12 |
Keep monthly history up to a year back. |
"Back up automatically every 2 hours, and let Kopia clean up old snapshots on its own, keeping a full year of history at a fine granularity."
Test a restore
7-1. Select a snapshot
Snapshots → click the snapshot point you want to restore.
7-2. Browse with the file browser
Click "Browse" → review the directory/file list.

7-3. Run the restore
Click "Restore Files & Directories" → enter the Destination path → "Restore".

Practical operation tips
Automate with the CLI
KopiaUI and the kopia CLI share the same repository. Create the repository in the GUI, then script repetitive tasks with the CLI.
# Check repository connection status
kopia repository status

# Back up a specific path immediately
kopia snapshot create ~/Developer

# List snapshots / restore a specific one
kopia snapshot list
kopia restore k1a2b3c4... ~/restore-test

# Clean up old snapshots per the retention policy + reclaim unused blocks
kopia snapshot expire --all --delete
kopia maintenance run --fullkopia snapshot create with cron or launchd and backups run in the background without KopiaUI open. Just use only one scheduler so it doesn't overlap with the GUI's.
Storage & performance
- Deduplication + compression: On top of block-level deduplication,
zstdcompression is applied by default, so the actual upload size is often smaller than the original. - Only the first backup is heavy: The initial snapshot uploads everything, but after that it's incremental — only changed blocks are sent — so hourly runs are light.
- Confirm the cloud sync finished: After Kopia writes to the local mount folder, the OneDrive/Google Drive app must finish the actual upload for the backup to exist "remotely." Right after a large backup, check the cloud app's sync status too.
Operate safely
- The password is the data: Lose the repository password and the entire backup is permanently unrecoverable. Always keep it separately in 1Password, Bitwarden, etc.
- The 3-2-1 rule: 3 copies, on 2 different media types, with 1 off-site. Don't rely on a single cloud — add one more repository on a NAS or external disk.
- Test restores regularly: Run a real restore at least once a quarter to guarantee it's a "backup that restores."
Wrap-up
If you've followed along, you now have an encrypted snapshot backup that runs automatically every 2 hours. To recap:
- Install KopiaUI → mount cloud/NAS as a local path → create an encrypted repository
- Exclude unnecessary files with Ignore to save time and space
- Use scheduling + retention to automatically manage a full year of point-in-time history
- Confirm it's a "backup that actually works" with a restore test
It comes down to one line: a backup is finished not when you set it up, but when a restore succeeds. Once you're set up, run a restore test today.
· Kopia official docs: kopia.io/docs
· Getting started: kopia.io/docs/getting-started
· GitHub releases: github.com/kopia/kopia/releases
At a glance
- Deduplication + compression: Block-level dedup and zstd compression use cloud storage efficiently.
- Retention policy: Set how many latest/hourly/daily/weekly/monthly snapshots to keep in Policies → Edit Policy → Retention.
- Mix GUI & CLI: Use
kopia snapshot list,kopia restore, and more against the same repository. - Back up the password: Without the password, the data simply can't be recovered.
- Restore is the real backup: Run restore tests regularly to ensure reliability.