2026년 6월 25일 목요일

How to Install Volumio in VMware (USB Boot via PLoP Boot Manager)

On x86, Volumio normally boots and runs from a USB device. VMware doesn't boot from USB sticks by default, so this guide shows how to get a Volumio USB to boot inside VMware using the PLoP Boot Manager, and then install it onto the VMware virtual disk.

What you need: a USB stick of 8 GB or larger.

1. Create the Volumio USB boot disk

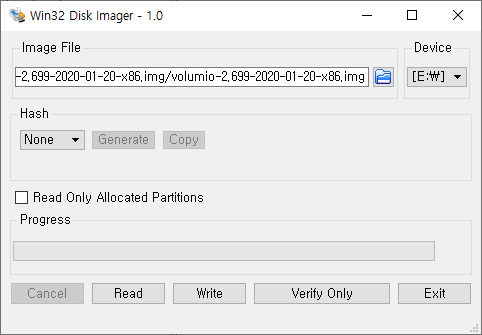
Download the PC (x86/x64) image from the Volumio website (https://volumio.org/) and write it to the USB stick with Win32 Disk Imager to make it bootable.

Creating a Volumio USB boot disk with Win32 Disk Imager

2. Two ways to boot the USB in VMware

  1. Attach the USB stick to VMware as a raw hard disk and boot from it.
  2. Use the PLoP Boot Manager ISO CD image to boot from the USB stick. Since VMware doesn't support USB-stick booting by default, this method makes it possible.

This guide uses the PLoP Boot Manager method. You can download it from plop.at; after downloading, extract the archive and place the plpbt.iso CD image in a convenient location. (In this example it's extracted to the D: drive.)

3. Configure the VMware guest

The VMware guest settings are as follows. Volumio is based on 32-bit Debian Linux, so set the guest OS to Debian. An IDE-type HDD of just 8 GB is plenty.

For the CD/DVD, I use an ISO image file and attach the plpbt.iso from the D: drive above.

VMware virtual machine settings for installing Volumio
Guest OSDebian (Volumio is 32-bit Debian-based)
Hard diskIDE type, 8 GB is enough
CD/DVDISO image file → plpbt.iso (PLoP Boot Manager)
USBInsert the Volumio USB stick and connect it to the guest

4. Boot the USB via PLoP Boot Manager

Insert the USB disk and connect it to the guest OS. Boot the CD/DVD first, and the plpbt.iso boot image lets you choose to boot from the USB stick.

Selecting USB boot in the PLoP Boot Manager

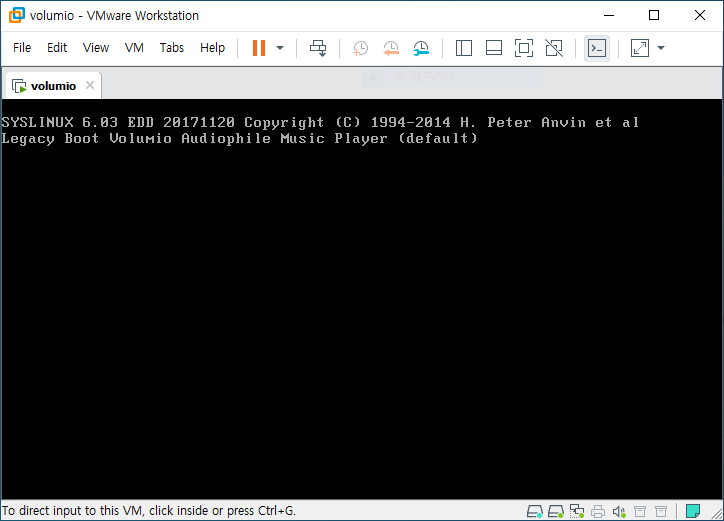
Once you choose to boot from USB, Volumio boots up as shown below.

Volumio booting inside VMware

5. Install Volumio to the VMware disk

Do the basic configuration first.

The Install To Disk menu in the Volumio settings

In the settings you'll see an Install To Disk (VMware) menu; clicking it installs Volumio onto the VMware disk.

Installing Volumio onto the VMware virtual disk
Volumio running in VMware after installation
Done. Once the installation is complete, you can remove the USB stick — after a reboot the VM boots from the VMware virtual disk.

UEFI Shell bcfg: Add & Remove Boot Entries (Fix OpenCore Boot Recovery)

Older motherboards and some UEFI firmware can't create boot entries automatically even when a bootloader exists on the EFI System Partition. When OpenCore won't boot without the USB stick, or its entry disappears from the BIOS boot list, you can add the NVRAM boot entry directly with the bcfg command from a standalone UEFI Shell.

Revised and updated as of 2026.
The core commands from the original post still hold, but I've added map -r to re-scan the filesystems, path verification, reordering boot entries, and pre-flight precautions. I also fixed the path separator that looked like a won sign on screen to the actual UEFI backslash (\).

When to use this method

  • The bootloader is on the EFI partition but doesn't appear in the BIOS boot list
  • Removing the OpenCore USB stops the internal disk from booting
  • You want to clean up duplicate Clover/OpenCore boot entries or change their order
  • The motherboard setup screen has no option to select an EFI file directly
Caution: bcfg directly modifies Boot#### and BootOrder in the firmware NVRAM. Deleting the Windows Boot Manager or the entry you currently boot from by mistake may require a recovery USB. It's safer to first photograph the output of bcfg boot dump -v.

OpenShell.efi vs. a standalone UEFI Shell

The OpenShell.efi you run from OpenCore's Tools is also a UEFI Shell, but it runs after OpenCore's drivers and NVRAM-related settings have already been applied. If your goal is to repair the firmware's actual boot entries, prefer the motherboard's built-in Shell, or a standalone UEFI Shell booted directly from EFI\BOOT\BOOTX64.EFI on a FAT32 USB.

Especially in setups that use OpenCore options like RequestBootVarRouting, the boot variables visible inside OpenCore may behave differently from the values the firmware manages directly. Rather than the old post's phrasing of "communicating with a virtual BIOS," it's more accurate to understand that working in a Shell before OpenCore intervenes makes the results easier to verify.

What you'll need

USBFormat as FAT32 and place the UEFI Shell executable at EFI\BOOT\BOOTX64.EFI
Bootloader pathA typical OpenCore default bootstrap is EFI\BOOT\BOOTx64.efi
Firmware settingsBoot the USB in UEFI mode. If the Shell file isn't signed, you may need to temporarily disable Secure Boot
Recovery prepPhotograph the existing boot list and keep a known-good bootable USB on hand

If your motherboard has a built-in UEFI Shell, you can use that feature without a separate USB. If bcfg isn't recognized in the Shell, that Shell build simply doesn't include the command, so you'll need to prepare a UEFI Shell that supports bcfg.

Adding an OpenCore boot entry with bcfg

  1. Refresh the filesystem mapping

    When the Shell starts, first re-scan the currently connected disks and partitions.

    map -r
    map

    Entries shown as FS0:, FS1: are filesystems the Shell can access. If you've reinserted the USB or changed the disk layout, always run map -r first.

  2. Find the EFI System Partition

    Switch to each filesystem and check whether it has an EFI folder.

    FS0:
    ls
    
    FS1:
    ls

    On a partition where OpenCore is installed, you'll usually see both EFI\BOOT and EFI\OC folders. Here we'll assume FS1: is the internal disk's EFI partition as an example.

  3. Verify the bootloader file actually exists
    ls FS1:\EFI\BOOT\BOOTx64.efi
    ls FS1:\EFI\OC\OpenCore.efi

    Don't register a guessed path — always confirm the file with ls. In OpenCore's official structure, BOOTx64.efi acts as the initial bootstrap and loads OpenCore.efi from the same EFI partition.

  4. Check the current boot list
    bcfg boot dump -v

    Adding -v makes it easy to see the device paths too. Before inserting a new entry at position 0, also check whether the same OpenCore entry already exists.

  5. Add the OpenCore entry
    bcfg boot add 0 FS1:\EFI\BOOT\BOOTx64.efi "OpenCore"

    0 means putting it at the very front of the BootOrder. If you want another OS to take priority, check the current list and use the appropriate position number. If you need a direct-launch configuration you can register FS1:\EFI\OC\OpenCore.efi, but for a typical install structure, using the default bootstrap path offers better compatibility.

  6. Confirm the result and exit
    bcfg boot dump -v
    exit

    After rebooting, check whether OpenCore appears in the BIOS boot list.

Deleting duplicates and changing the order

Remove an unneeded boot entry

bcfg boot dump -v
bcfg boot rm 3

After rm, use the position number you confirmed in the list printed first. Don't just see a variable named Boot0003 and blindly type rm 3 — go by the order that the current bcfg boot dump shows.

Change the boot order

bcfg boot mv 3 0

This moves the entry at position 3 to position 0, i.e. to the front. You can adjust the order with mv without deleting and recreating it.

When it disappears again after registering

  • The firmware may fail to save NVRAM boot variables, or it may remove an invalid entry on every boot.
  • A CMOS reset, a BIOS update, or another OS's bootloader recovery can change the BootOrder.
  • In that case, keeping the removable-media default path EFI\BOOT\BOOTx64.efi helps the firmware find the file even without a separate NVRAM entry.
  • For OpenCore, it's good to also check the official docs' LauncherOption and the install structure.

Quick command summary

map -r
FS1:
ls FS1:\EFI\BOOT\BOOTx64.efi
bcfg boot dump -v
bcfg boot add 0 FS1:\EFI\BOOT\BOOTx64.efi "OpenCore"
bcfg boot dump -v
exit
Two things matter most.
First, don't treat a number like FS1: as a fixed value — verify the actual EFI partition every time. Second, always keep a verbose list before any deletion. Following just these two greatly reduces the risk of touching the wrong disk or the Windows Boot Manager.

Official references

Self-Hosted RustDesk Server Setup: Docker & Proxmox VE LXC (+ Client Config Guide)

RustDesk Self-hosted Guide

Self-host a RustDesk Server: Two Ways — Linux Docker and Proxmox VE LXC

A private remote-control setup that uses fast P2P direct connections at home and your own server as a relay gateway when you're away.

Linux Docker Proxmox VE LXC hbbs / hbbr macOS / Windows / Linux Client
What this post covers
  1. Why bother self-hosting RustDesk
  2. What a self-hosted RustDesk server does
  3. Option A: Install on a Linux server with Docker Compose
  4. Option B: Install on Proxmox VE as an LXC
  5. Common port forwarding and the security key
  6. Client setup for Windows, macOS, and Linux
  7. Connection test and shortcut tips

1. Why bother self-hosting RustDesk

My main reason for running RustDesk as a self-hosted server is simple. In an environment that mixes Mac, Windows, and Linux, every existing remote-control option felt a little awkward in its own way.

The limits of Mac VNC

Apple VNC is quite fast between Apple devices thanks to its own codec. But the moment you go from a Mac to Windows or Linux, you need a separate VNC client and the perceived speed drops considerably.

The hassle of Windows ↔ Linux

Connecting Windows and Linux means setting up an RDP-style config separately. RDP under Wayland in particular is tricky to deal with, and Remmina has a clunky UI with settings that feel complicated.

Services like TeamViewer or Chrome Remote Desktop are convenient, but their relay servers live outside your network. So speed depends on the state of an external server and the network path, and there's a lingering security concern about entrusting your personal machines to them indefinitely.

A self-hosted RustDesk server is a choice to reduce that friction. At home you connect as directly as possible at LAN speed, and when you're away you use the server you built as the relay point. In other words, it unifies cross-OS remote control into a single client experience while bringing the relay point onto your side.

2. What a self-hosted RustDesk server does

If you just use RustDesk as-is, it locates device IDs and attempts connections through the default public server. Setting up your own server brings that role into your home or your own server. Instead of relying on an external company's relay, your server takes on the roles of ID server and relay server.

A RustDesk server is split into two main services. hbbs is the ID server that finds where a device is, and hbbr is the relay server that forwards screen and input data on your behalf when a direct P2P connection fails.

When two devices at home are on the same LAN, they connect directly via P2P whenever possible; when a direct connection is hard because of an external network or NAT, they are relayed through your RustDesk server.

3. Option A: Install with Linux Docker Compose

For a regular Ubuntu, Debian, mini PC, or NAS-style Linux server, Docker Compose is the easiest to manage. Server data stays in a separate folder, and you can bring just the containers up and down easily.

2-1. Create a working folder

mkdir -p ~/rustdesk-server/data
cd ~/rustdesk-server

2-2. Write compose.yml

In the example below, change 192.168.0.15 to your actual Linux server's internal IP or DDNS address. As in the original docs, adding the -k _ option requires clients to enter the public key before they can use the server.

services:
  hbbs:
    container_name: rustdesk-hbbs
    image: rustdesk/rustdesk-server:latest
    command: hbbs -r 192.168.0.15:21117 -k _
    volumes:
      - ./data:/root
    ports:
      - "21115:21115"
      - "21116:21116"
      - "21116:21116/udp"
      - "21118:21118"
    depends_on:
      - hbbr
    restart: unless-stopped

  hbbr:
    container_name: rustdesk-hbbr
    image: rustdesk/rustdesk-server:latest
    command: hbbr -k _
    volumes:
      - ./data:/root
    ports:
      - "21117:21117"
      - "21119:21119"
    restart: unless-stopped
The official RustDesk docs also recommend the network_mode: "host" approach on Linux Docker. If port mapping gets confusing, host networking is simpler; if you want to clearly separate ports as on a shared server or NAS, run it with the port-mapping approach above.

2-3. Run the containers

docker compose up -d
docker compose ps

2-4. Check the public key

This value goes into every client's settings. Copy the entire long string that's printed.

cat data/id_ed25519.pub

4. Option B: Install on Proxmox VE as an LXC

If you already run Proxmox VE, it's cleaner to isolate the RustDesk server in an LXC container. The original docs' example sets the LXC internal IP to 192.168.0.15 and accesses the web admin dashboard at http://192.168.0.15:21114.

3-1. Create the LXC from the Proxmox VE Shell

If you use a community Helper Script, you can run the RustDesk Server LXC script from the Proxmox VE Shell to create the container. It's a good idea to review the script's contents once before running it.

bash -c "$(curl -fsSL https://raw.githubusercontent.com/community-scripts/ProxmoxVE/main/ct/rustdeskserver.sh)"

3-2. Check the LXC IP and dashboard

Example LXC internal IP

192.168.0.15

Web admin dashboard

http://192.168.0.15:21114

3-3. Check the public key from the LXC console

In the Proxmox web GUI, select the RustDesk LXC, go to the Console tab, and run the command below.

cat /var/lib/rustdesk-server/id_ed25519.pub

The long string that's printed is the public key for the client's Key field. Enter the same value in every client — macOS, Windows, and Linux.

3-4. Reset the admin password

If you can't log into the web dashboard or don't know the initial password, set a new admin password from the LXC console.

cd /var/lib/rustdesk-api
rustdesk-api reset-admin-pwd your-desired-password

Then open http://192.168.0.15:21114 in a browser and log in with the username admin and the password you just set.

5. Port forwarding

To connect from outside your home, your router must forward ports to the RustDesk server's IP. If you'll only use it internally, you can skip router port forwarding — but if you want external access, check the ports below.

PortProtocolRoleNotes
21114TCPWeb admin dashboard / APIOpen carefully, only if you view the dashboard externally
21115TCPNAT type test and auth handlingRequired
21116TCP / UDPID registration, heartbeat, hole punchingMost important. UDP is needed too
21117TCPRelay server hbbrRelays when P2P fails
21118TCPWebSocket for the web clientOptional if you don't use the web client
21119TCPRelay WebSocketOptional if you don't use the web client
For an external address, a DDNS hostname is more convenient than a public IP. For example, if you set myhome.duckdns.org as the ID and relay server address, you can keep using the same settings from outside your home.

6. Client setup: common to Windows, macOS, and Linux

Whether you built the server with Docker or a PVE LXC, the client setup is almost the same. Launch RustDesk on every device, then go to Network or ID/Relay Server settings from the menu next to your ID.

  1. ID Server: Enter the RustDesk server's IP or DDNS address. e.g. 192.168.0.15 or myhome.duckdns.org
  2. Relay Server: Enter the same address. It's sometimes inferred if left blank, but in a homelab it's less confusing to specify it.
  3. API Server: For an OSS server, usually leave it blank. Enter it only when using Pro or web-console account features.
  4. Key: Paste the entire id_ed25519.pub string you got from the server.
  5. Press Apply and confirm the bottom of the main screen shows Ready.

Example client input

If you test on the LAN first, put the RustDesk server's internal IP into both the ID server and Relay server as shown below. The example uses 192.168.0.15 and leaves the API server blank. In the last Key field, paste the entire id_ed25519.pub public key copied from the server.

RustDesk client network settings example screen
RustDesk Settings → Network → ID/Relay server input example. For internal testing, enter the server's internal IP; for external access, switch to a DDNS address.

Required permissions when macOS is the remote target

When using a Mac as the controlled host, you must grant macOS security permissions. In System Settings → Privacy & Security, find RustDesk and allow the following.

  • Screen Recording
  • Accessibility
  • Input Monitoring: grant this too when you need complex shortcuts or input control

After changing permissions, you must fully quit and relaunch RustDesk for them to take effect.

Installing the Linux viewer

When Linux acts only as the viewer that watches the remote screen, it runs into fewer screen-capture permission issues. On Ubuntu/Debian, install the official release .deb package, or use Flatpak/AppImage regardless of distribution.

sudo apt update
sudo apt install ./rustdesk-*.deb
flatpak install flathub com.rustdesk.RustDesk

7. Connection test and shortcut tips

Check the 9-digit ID shown on the RustDesk screen of the computer to be controlled, then enter that ID in the remote-desktop field on the controlling computer and connect. Enter the password or approve it on the other side's screen, and the session opens.

For a device you connect to all the time, set a Permanent Password on the remote target so you don't have to check the ever-changing temporary password each time.

When controlling a Mac from a Linux or Windows keyboard, the Win/Super key usually acts like macOS's Command key. For example, Win + C in the Linux viewer is delivered as Cmd + C (copy) on the Mac host.

If it doesn't feel right, adjust the Ctrl-to-Command mapping in the keyboard options on the top toolbar during a RustDesk session.

Final checklist

  • Confirm both hbbs and hbbr are running on the server
  • Confirm the client's ID Server, Relay Server, and Key all point to the same server
  • If external access fails, first check whether 21116 UDP port forwarding is missing
  • If the Mac screen isn't visible, check Screen Recording permission; if mouse/keyboard don't work, check Accessibility permission
  • If you regenerate the public key or change the data folder, update the Key on every client again

macOS Cloud Backup with KopiaUI: OneDrive, Google Drive & NAS (Step-by-Step)

How to Set Up Cloud Backup on macOS with KopiaUI
OneDrive · Google Drive · NAS Integration Guide

A step-by-step guide to building a cloud backup on macOS with KopiaUI, using OneDrive, Google Drive, or a NAS as the repository. It covers everything from installing KopiaUI to creating a repository, excluding files, scheduling automatic backups with a snapshot retention policy, and finally running a restore test — giving you a safe macOS backup with point-in-time snapshots, encryption, and deduplication.

OSmacOS 12 or later
Backup toolKopiaUI v0.23.1
RepositoryOneDrive · Google Drive · NAS
Install methodHomebrew

The backup you copy to an external drive "every now and then" falls apart the moment you lose a file and find yourself asking, "When did I last copy this?" Accidentally overwritten files, ransomware, and disk failures arrive without warning — and a plain copy or sync only protects the single current state.

Kopia solves this with point-in-time snapshots. You can roll back to an hour ago, yesterday, or any point last week, and because everything is encrypted locally with AES-256-GCM before upload, not even the cloud provider can read it. Thanks to block-level deduplication, backing up every hour barely increases your storage usage. On top of that, it reuses the OneDrive, Google Drive, or NAS you already have as the repository — so there's no extra cost.

This guide walks through how to use KopiaUI as a backup tool on macOS, from connecting OneDrive, Google Drive, or NAS cloud storage to scheduling automatic backups, setting a retention policy, and running a restore test — all configured the way you'd actually run it.

Choosing a backup tool — why KopiaUI? (vs. Kopia CLI & Restic)

Several tools can do the same job.

ToolCharacteristics
Kopia CLI Same engine as KopiaUI. Great for scripted automation in the terminal. Preferred in server environments.
Restic + Rclone Restic for snapshot backups, Rclone for cloud connectivity. A powerful combination, but the CLI setup is complex.
KopiaUI GUI based. Easy even for non-developers and general users who'd rather avoid the CLI. Open source and free.
💡
KopiaUI and the Kopia CLI share the same repository. You can set things up in the GUI and still automate with the CLI — mixing both works fine.

Why use Kopia instead of plain mirroring?

If you just use OneDrive or Google Drive, your files do sync to the cloud — that's true. But there are problems, listed below.

IssuePlain mirroringKopia backup
Versioning Keeps only the current state. Delete a file by mistake and it's gone from the cloud too. Keeps point-in-time snapshots. Restore to any past point.
Special characters in filenames Names like .hidden, file:name, a/b that OneDrive/Google Drive reject can't sync. Stores file contents as encrypted chunks, so there are no filename restrictions.
Dotfiles & config files Hidden files like .env, .ssh, .claude are limited or missed in sync. Can back up every file.
Symbolic links Links break or get ignored. Preserves link metadata (and can follow the target too, as an option).
Encryption The cloud provider can read your content. Encrypted locally with AES-256-GCM before upload. Even the provider can't read it.

1

Install KopiaUI (Homebrew · macOS)

brew install --cask kopiaui

If you don't have Homebrew, install it first from brew.sh. KopiaUI requires macOS 12 (Monterey) or later, and the install package bundles both the kopia CLI binary and the GUI. To download it directly, see the official installation docs.

Launch it from Launchpad or Spotlight (⌘ + SpaceKopiaUI).

💡
A macOS security warning may appear on first launch → System Settings → Privacy & Security → Allow.

Once it starts, the Select Storage Type screen appears.

KopiaUI first launch — Select Storage Type screen
KopiaUI first launch — the Select Storage Type screen

2

Connect cloud storage — OneDrive · Google Drive · NAS

KopiaUI has no dedicated cloud-integration menu. Instead, you install each cloud service's native macOS app, let it mount as a local folder, and then point KopiaUI to that local path.

Why this approach works well No need to install rclone, no OAuth admin approval required.
The cloud app handles syncing, so Kopia just behaves as if it's writing to a local disk.

2-1. OneDrive (Microsoft 365)

brew install --cask onedrive

Launch the app → sign in with your Microsoft 365 account → after the sync completes, check the mount path:

ls ~/Library/CloudStorage/
# OneDrive-YourCompany

mkdir ~/Library/CloudStorage/OneDrive-YourCompany/KopiaBackup

2-2. Google Drive

brew install --cask google-drive

Launch the app → sign in with your Google account, then set the sync option to "Stream files".

Google Drive Stream files sync setting
Google Drive preferences — choosing Stream files (saves local disk space)
💡
Stream files vs. Mirror files
Stream files keeps files in the cloud only and downloads them on access, so it uses almost no local disk space.
When Kopia takes a snapshot it automatically pulls the files it needs, so backup works even without mirroring.

After the sync completes, check the mount path:

ls ~/Library/CloudStorage/
# GoogleDrive-your@gmail.com

mkdir ~/Library/CloudStorage/GoogleDrive-your@gmail.com/My\ Drive/KopiaBackup
💡
For Google Drive you must create the folder under My Drive. You can't write directly under GoogleDrive-*/.

2-3. NAS (Synology, etc.)

If you have a personal NAS, you can connect it two ways.

Option A — Network mount (SMB)
Finder → ⌘K → enter smb://nas-ip/share → after mounting, point KopiaUI's Local Directory to /Volumes/ShareName/.

# Verify the mount
ls /Volumes/
# ShareName  ...

mkdir /Volumes/ShareName/KopiaBackup

Option B — SFTP (built into KopiaUI, recommended for Synology)
SFTP mounting on macOS is cumbersome because it needs extra tools (macFUSE, etc.). KopiaUI has a built-in SFTP backend, so it can connect directly without mounting.

On the Select Storage Type screen, choose "SFTP Server", then:

FieldExample
Hostname192.168.1.100 or the NAS domain
Port22
UsernameNAS account
Path/volume1/backup/KopiaBackup
Key authRegister an SSH key and no password is needed
💡
On Synology, enable SSH in DSM Control Panel → Terminal & SNMP first.
If you already use the Synology Drive app, it mounts at ~/Library/CloudStorage/SynologyDrive-xxx/, so the Local Directory approach works too.

Repository path summary

ServiceMethodPath / setting
OneDrive Local Directory ~/Library/CloudStorage/OneDrive-xxx/KopiaBackup
Google Drive Local Directory ~/Library/CloudStorage/GoogleDrive-xxx/My Drive/KopiaBackup
NAS (SMB) Local Directory /Volumes/ShareName/KopiaBackup
NAS / Synology SFTP Server Hostname + Port 22 + remote path

3

Create a KopiaUI repository

3-1. Choose "Local Directory or NAS"

On the Select Storage Type screen, click "Local Directory or NAS".

3-2. Enter the Directory Path

Enter the path of the backup folder you created earlier.

# OneDrive
/Users/your-username/Library/CloudStorage/OneDrive-YourCompany/KopiaBackup

# Google Drive
/Users/your-username/Library/CloudStorage/GoogleDrive-you@gmail.com/My Drive/KopiaBackup
KopiaUI backup repository path configuration screen
Enter the repository path, then click Next

3-3. Set the repository password

Kopia encrypts the repository with AES-256-GCM.

⚠️
Lose the password and the data is unrecoverable Be sure to store it separately somewhere safe, like 1Password or Bitwarden.
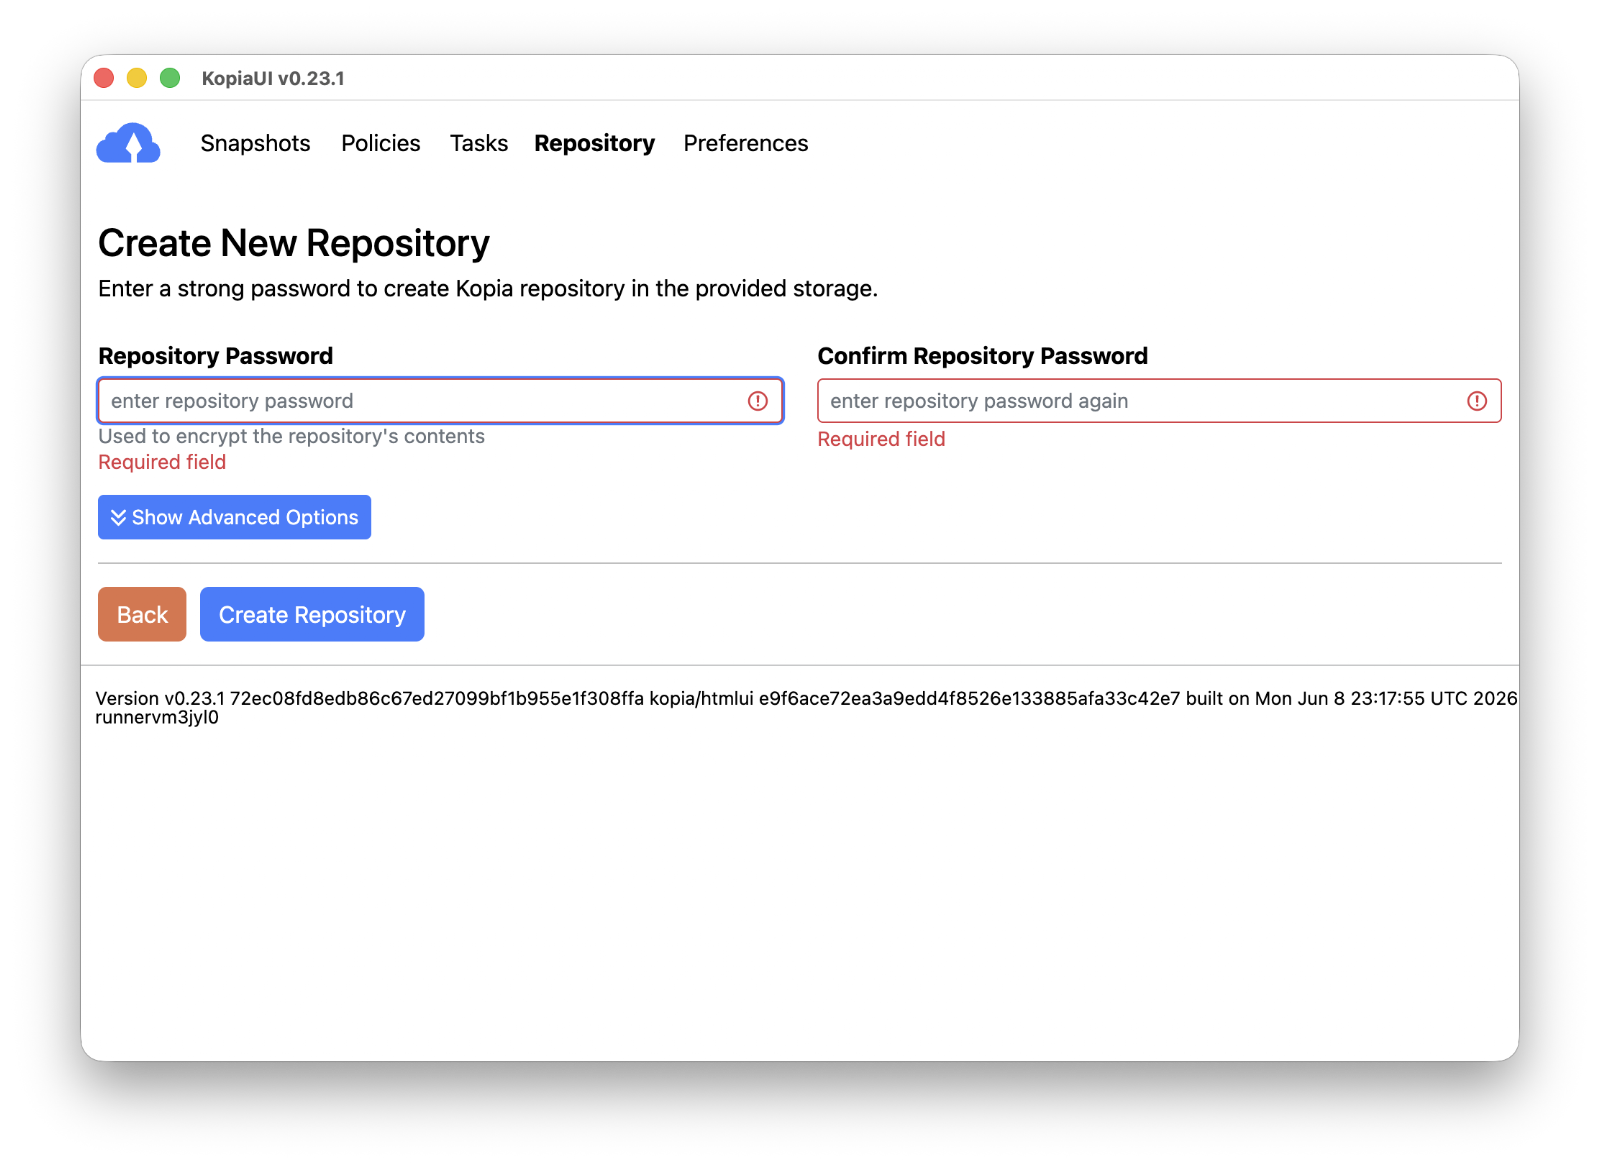
KopiaUI repository encryption password setup
Setting the repository encryption password

Click "Create Repository" → the repository is created.

KopiaUI repository created — My Repository screen
Repository created — the My Repository screen

4

Set up file exclusions (Ignore)

Exclude files/directories you don't need to back up, to save time and space.

Method 1: Policy UI (KopiaUI)

Snapshots → select a snapshot → Edit"Files" tab → enter patterns under Ignore Files.

.DS_Store
.Spotlight-V100
.Trashes
.fseventsd
Library/Caches
Library/CloudStorage
💡
The ~/ tilde doesn't work. Enter paths relative to the backup root.
The Effective column shows, in real time, the patterns that will actually apply.
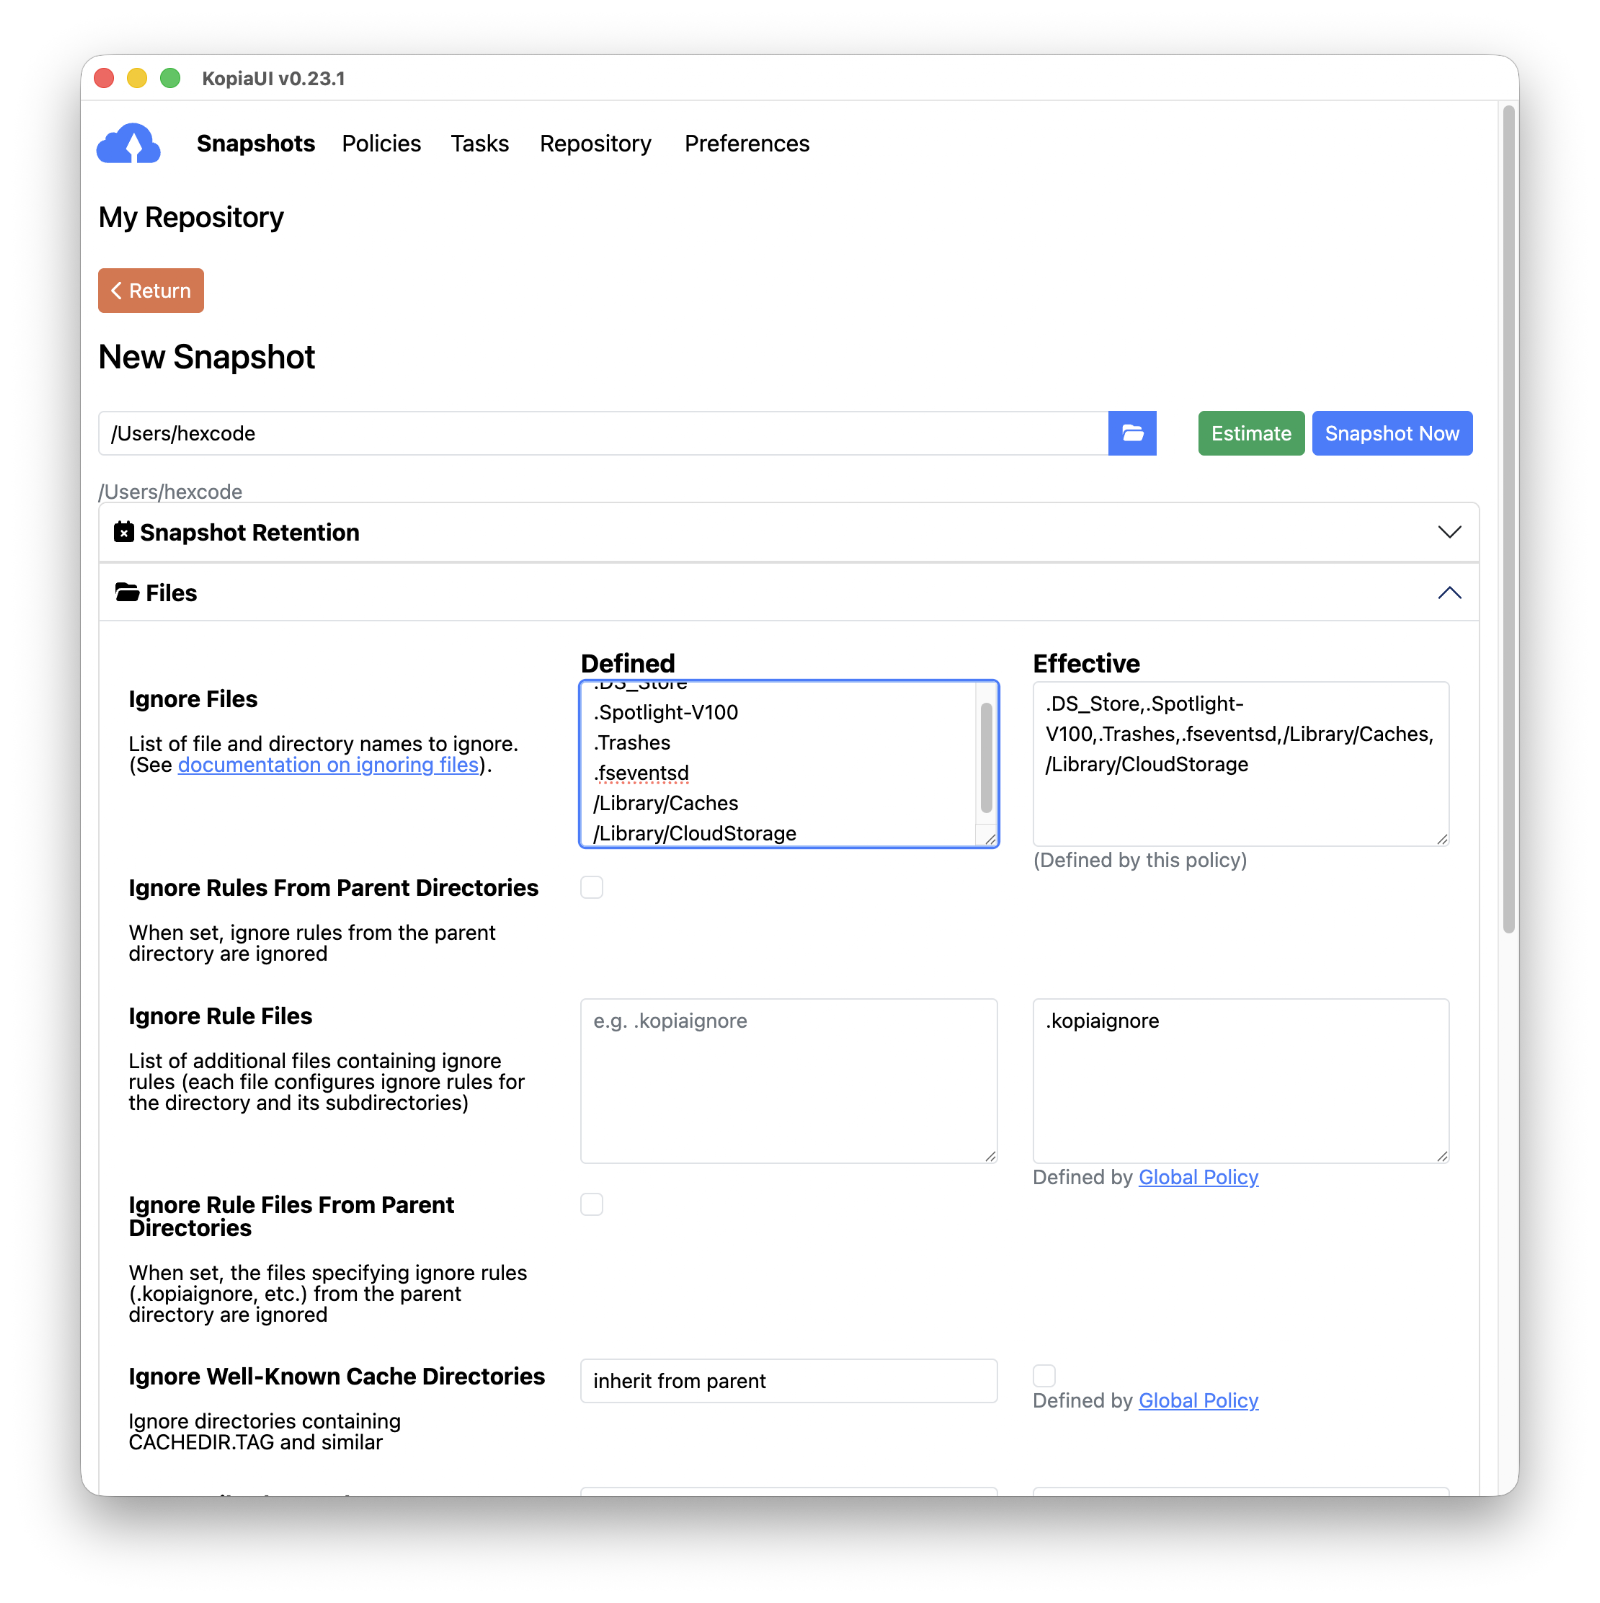
KopiaUI backup ignore files policy screen
Ignore Files setup — checking Defined / Effective patterns
💡
Excluding Library/CloudStorage is especially important
It prevents duplicate backups of data already in the cloud, such as OneDrive or Synology Drive.

Method 2: .kopiaignore file

Create a .kopiaignore file in the directory being backed up and Kopia reads it automatically. It uses the same syntax as gitignore.

cat > ~/.kopiaignore << 'EOF'
.DS_Store
.Spotlight-V100
.Trashes
.fseventsd
Library/Caches/
Library/CloudStorage/
EOF

If you register .kopiaignore under Ignore Rule Files in the Policy UI, the .kopiaignore files in subdirectories are applied automatically too.

Symbolic links

By default Kopia backs up only the symbolic link itself (its metadata) and doesn't follow the target. Turning on the "Follow symlinks" option in the Policy → Files tab follows the target and backs up the actual contents.

💡
Be careful on macOS if ~/Desktop or ~/Documents are symlinked into iCloud Drive.

5

Run your first snapshot (backup)

Snapshots tab → "New Snapshot" → enter the local path to back up → click "Snapshot Now".

Once the backup starts, you can watch progress in real time on the Tasks tab.

KopiaUI snapshot backup in progress screen
Backup in progress — live view on the Tasks tab

When it finishes, check the result in the snapshot list.
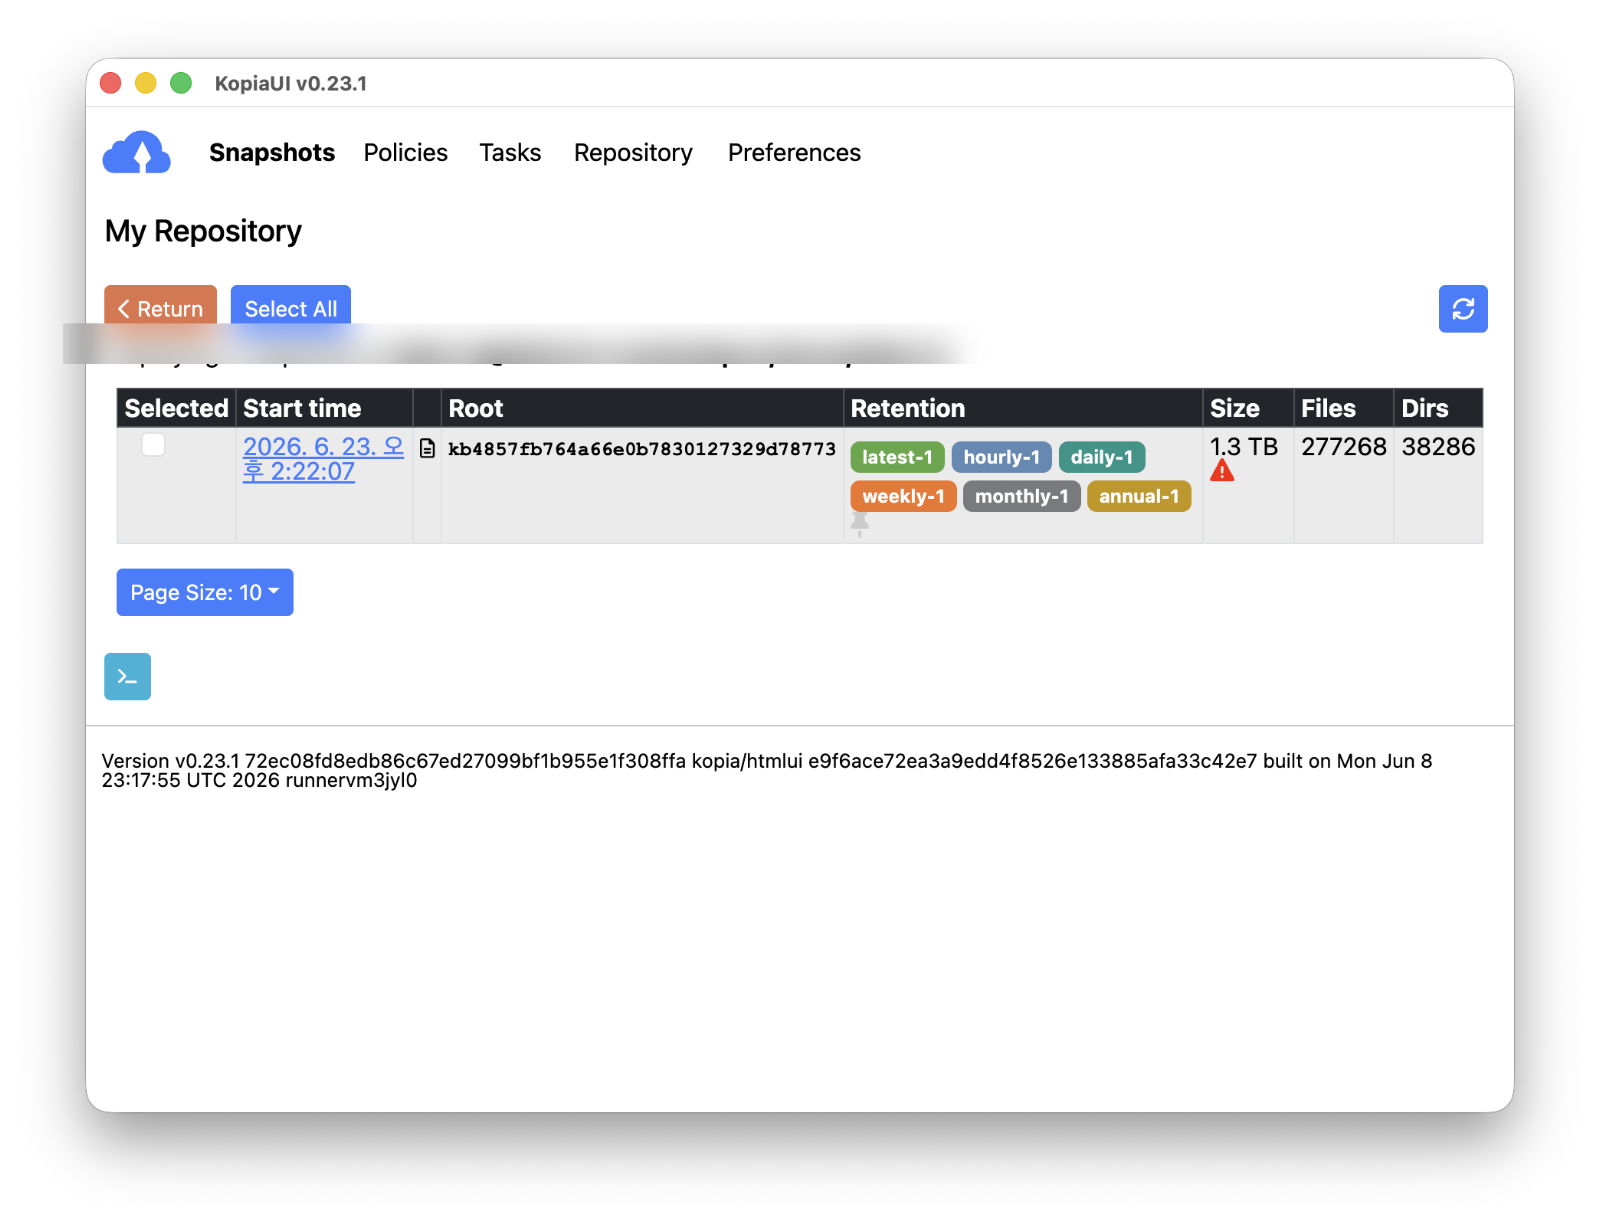
KopiaUI backup complete snapshot result screen
Backup complete — 1.3 TB, 277,268 files

6

Set up scheduling & retention policy

Under Policies"Edit Policy", configure Scheduling and Retention together.

⏱️ Scheduling — snapshot frequency

Setting the Snapshot Interval to 1 hour or 2 hours is recommended.

💡
If you lose a file by mistake while coding, you can instantly restore to its state from at most 1–2 hours ago.
Because it's an incremental backup that stores only changed files, running it every hour barely uses any space.
If hourly feels like too much, 4 hours or Daily are good alternatives.
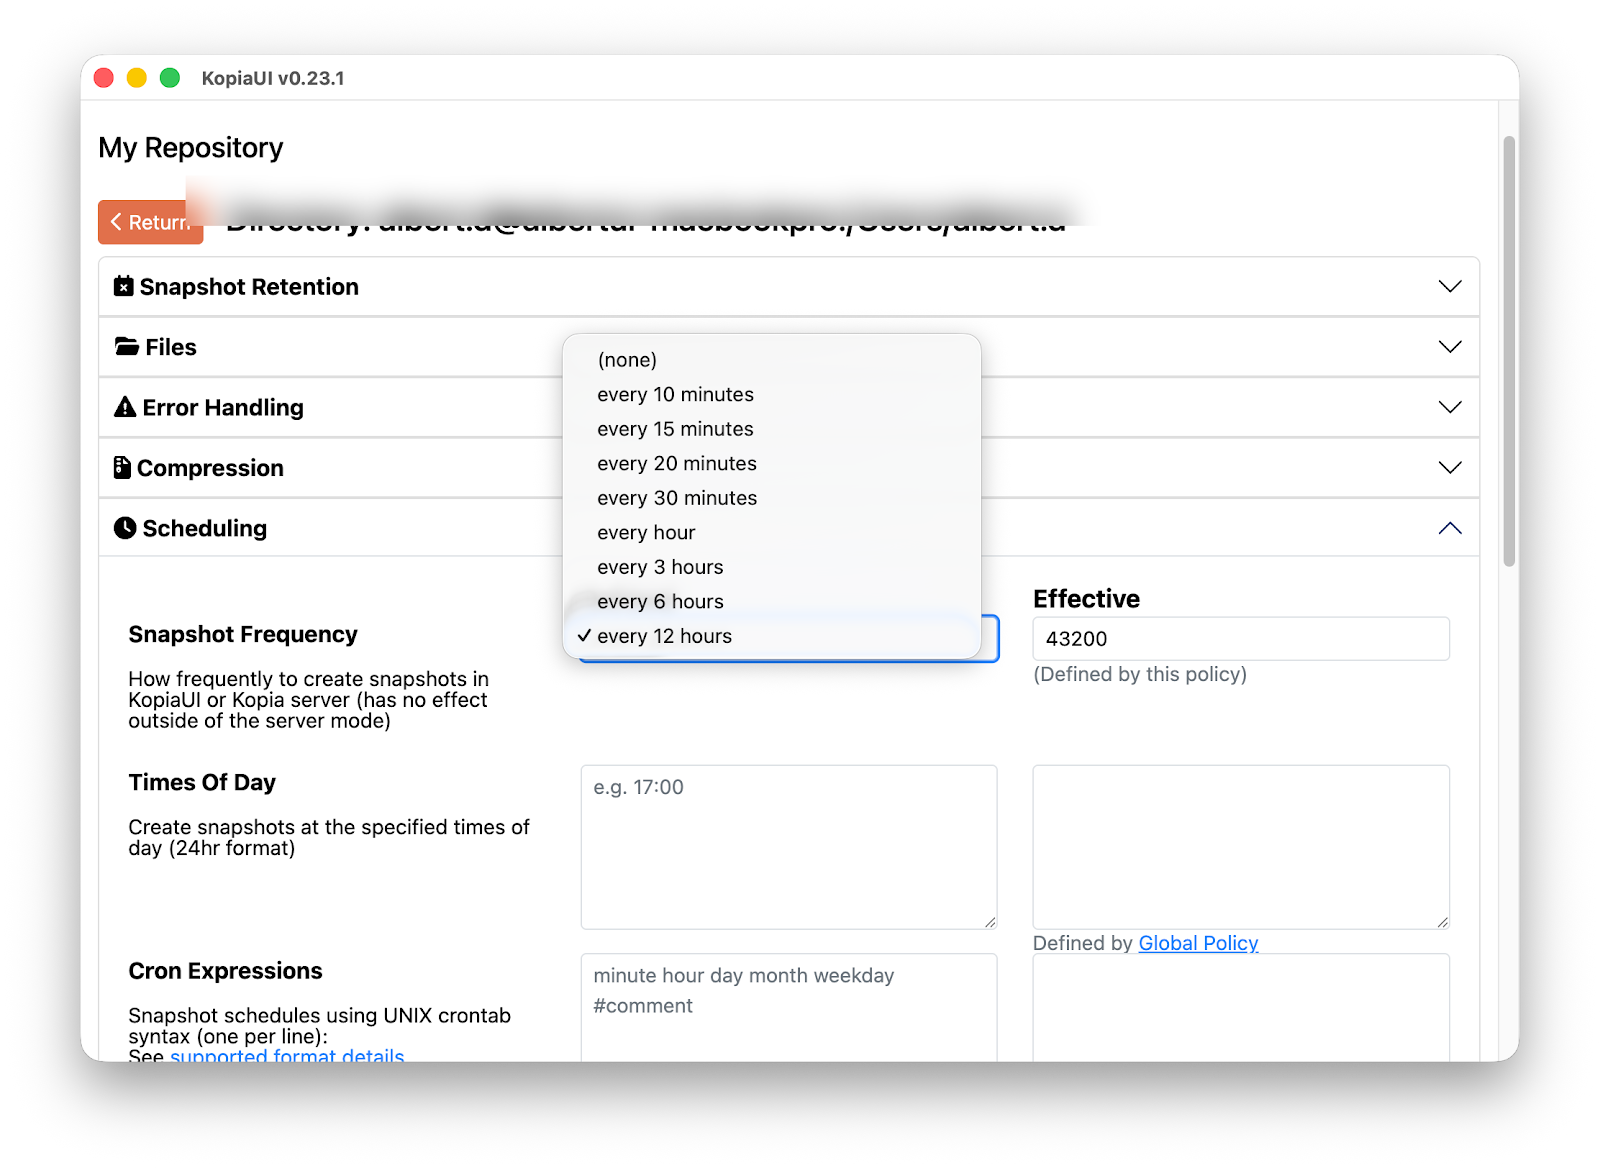
KopiaUI automatic backup scheduling screen
Scheduling tab — the Snapshot Frequency dropdown

🗄️ Retention — snapshot retention policy

The more often you back up, the more the cleanup rule for old snapshots matters. Configure it in Policies → Edit Policy → Retention.

Setting Recommended Description
Keep Latest 10 Always keep the 10 most recent snapshots — instantly undo a mistake you just made.
Keep Hourly 24 Keep hourly history for the past 24 hours.
Keep Daily 7 Keep daily history for the past week.
Keep Weekly 4 Keep weekly history up to a month back.
Keep Monthly 12 Keep monthly history up to a year back.
💡
In short
"Back up automatically every 2 hours, and let Kopia clean up old snapshots on its own, keeping a full year of history at a fine granularity."
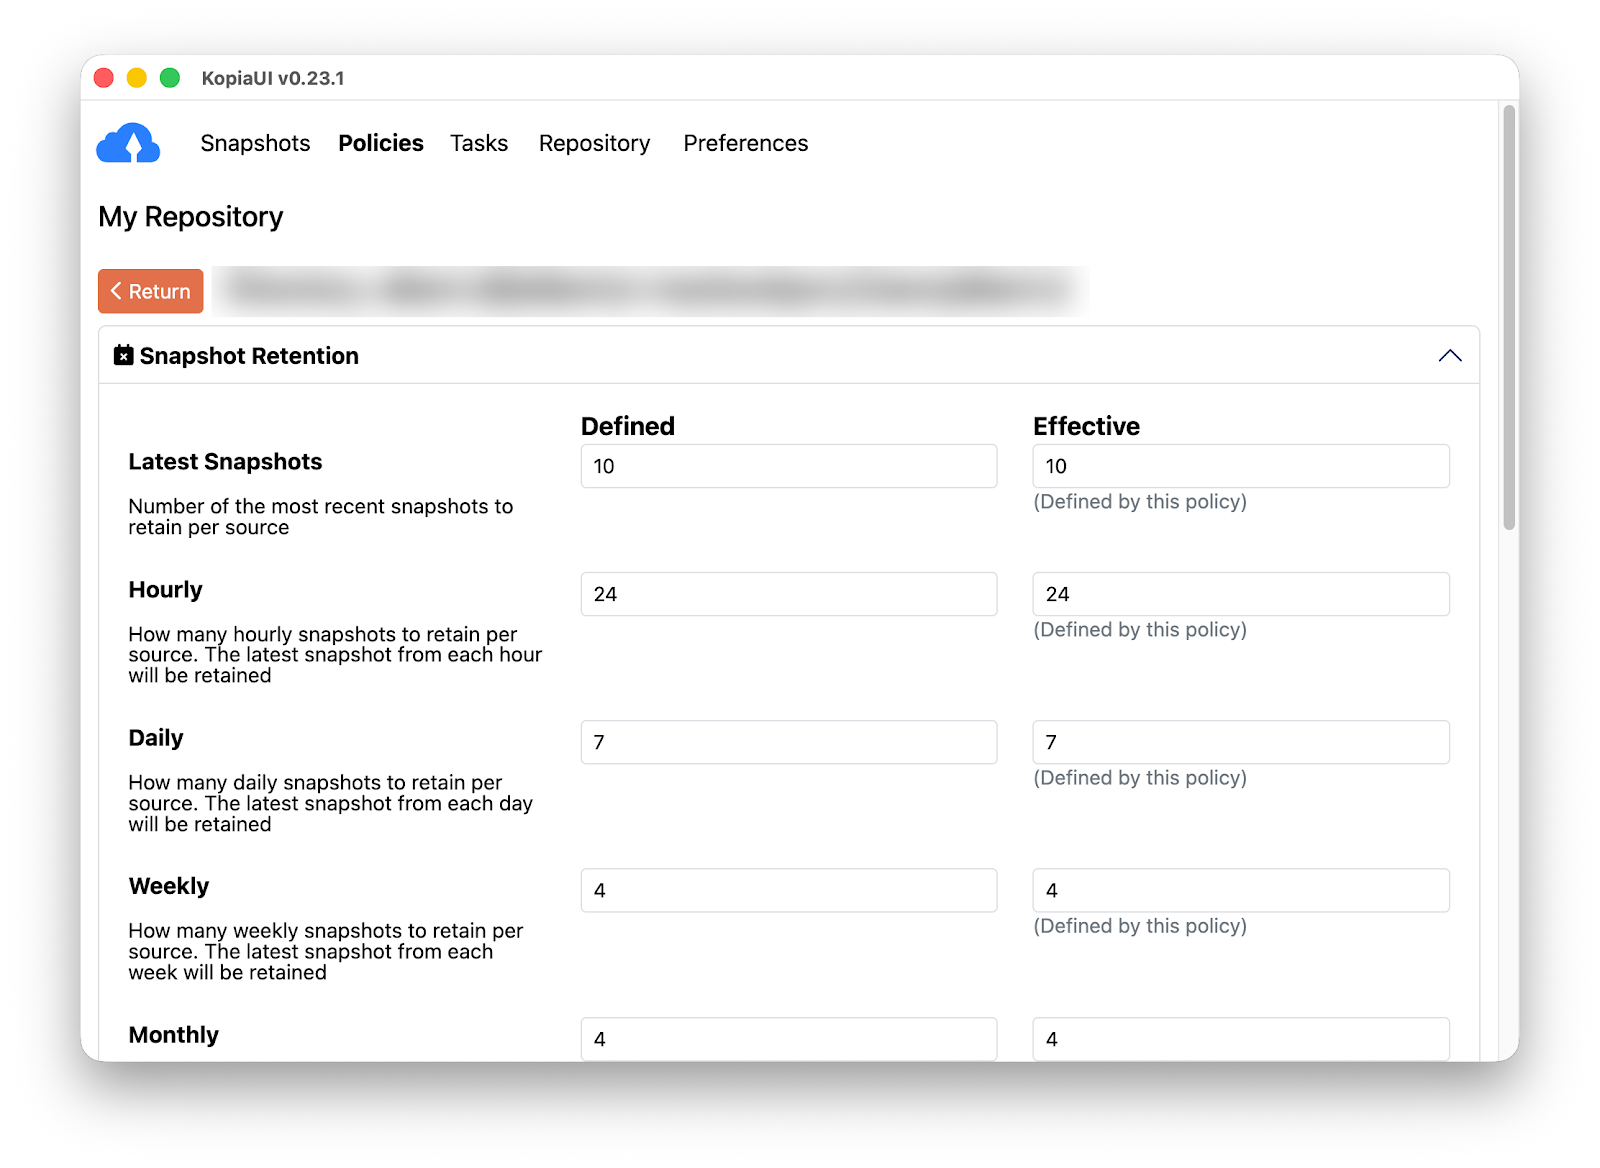
KopiaUI snapshot retention policy screen
Retention tab — retention policy configured

7

Test a restore

🔑
A backup is only real once it restores. Always finish with a restore test.

7-1. Select a snapshot

Snapshots → click the snapshot point you want to restore.

7-2. Browse with the file browser

Click "Browse" → review the directory/file list.

KopiaUI snapshot restore file browser screen
Snapshot file browser — explore files at a given point in time

7-3. Run the restore

Click "Restore Files & Directories" → enter the Destination path → "Restore".

KopiaUI backup restore destination configuration screen
Restore destination and options

8

Practical operation tips

Automate with the CLI

KopiaUI and the kopia CLI share the same repository. Create the repository in the GUI, then script repetitive tasks with the CLI.

# Check repository connection status
kopia repository status

# Back up a specific path immediately
kopia snapshot create ~/Developer

# List snapshots / restore a specific one
kopia snapshot list
kopia restore k1a2b3c4... ~/restore-test

# Clean up old snapshots per the retention policy + reclaim unused blocks
kopia snapshot expire --all --delete
kopia maintenance run --full
💡
Schedule kopia snapshot create with cron or launchd and backups run in the background without KopiaUI open. Just use only one scheduler so it doesn't overlap with the GUI's.

Storage & performance

  • Deduplication + compression: On top of block-level deduplication, zstd compression is applied by default, so the actual upload size is often smaller than the original.
  • Only the first backup is heavy: The initial snapshot uploads everything, but after that it's incremental — only changed blocks are sent — so hourly runs are light.
  • Confirm the cloud sync finished: After Kopia writes to the local mount folder, the OneDrive/Google Drive app must finish the actual upload for the backup to exist "remotely." Right after a large backup, check the cloud app's sync status too.

Operate safely

  • The password is the data: Lose the repository password and the entire backup is permanently unrecoverable. Always keep it separately in 1Password, Bitwarden, etc.
  • The 3-2-1 rule: 3 copies, on 2 different media types, with 1 off-site. Don't rely on a single cloud — add one more repository on a NAS or external disk.
  • Test restores regularly: Run a real restore at least once a quarter to guarantee it's a "backup that restores."

Wrap-up

If you've followed along, you now have an encrypted snapshot backup that runs automatically every 2 hours. To recap:

  • Install KopiaUI → mount cloud/NAS as a local path → create an encrypted repository
  • Exclude unnecessary files with Ignore to save time and space
  • Use scheduling + retention to automatically manage a full year of point-in-time history
  • Confirm it's a "backup that actually works" with a restore test

It comes down to one line: a backup is finished not when you set it up, but when a restore succeeds. Once you're set up, run a restore test today.

🔗
Reference links
· Kopia official docs: kopia.io/docs
· Getting started: kopia.io/docs/getting-started
· GitHub releases: github.com/kopia/kopia/releases

At a glance

  • Deduplication + compression: Block-level dedup and zstd compression use cloud storage efficiently.
  • Retention policy: Set how many latest/hourly/daily/weekly/monthly snapshots to keep in Policies → Edit Policy → Retention.
  • Mix GUI & CLI: Use kopia snapshot list, kopia restore, and more against the same repository.
  • Back up the password: Without the password, the data simply can't be recovered.
  • Restore is the real backup: Run restore tests regularly to ensure reliability.
Stream Your PC Games to a Samsung TV — Sunshine + Moonlight Setup Guide (Free GeForce Now Alternative)

Stream Your PC Games to a Samsung TV — Sunshine + Moonlight Cloud gaming like GeForce Now costs a monthly subscription. But what if you u...